PowerOptimal Elon® Smart Troubleshooting Guide for Electricians v1.7
NOTE: This Troubleshooting Guide is intended for electricians and not general users. Users should please refer to the User Manual, which can be found at www.poweroptimal.com/manuals. Always check the PowerOptimal website for the latest version of this guide.
Unit no. | Development name | Elon® serial no. | |||||
Date | Name: 1st level support person | ||||||
Unit construction status (Works OR Final Completion) | Resident name | ||||||
Reported issue (customer) | |||||||
Reported issue (Level 1 Support) | |||||||
Troubleshooting Steps
No. | Action | Result | Units | |
1 | Open the Elon Smart app. (Download the Elon Smart Water app from the Google Play or Apple app stores if you don’t have it installed on your phone. Make sure that you have the latest version of the app – you can check by searching “Elon Smart Water” in your app store and tapping “Update”.) | 🞏 | ||
2 |
| 🞏 | ||
3 |
(the gear icon) to the right of the thermostat on the app status screen. | 🞏 | ||
4 | Check for any alarms at the bottom of the screen and rectify accordingly (See list of alarms at the end of this guide) | 🞏 | ||
5 | If you cannot access the thermostat from the app, confirm that
| 🞏 | DC closed | |
🞏 | AC closed | |||
6 | If you still cannot access the thermostat from the app, remove the geyser end cover and:
| 🞏 | Wiring correct | |
V DC & correct polarity | ||||
| V AC | |||
7 | Write down the conclusion from your testing (What caused the reported issue?) & any other observations: | |||

 If you don’t have the specific thermostat in your device list, scan its QR code (on the house DB or on the thermostat itself) to add it by tapping the + button in the Elon Smart app.
 Open the Thermostat Settings screen by tapping the Settings button
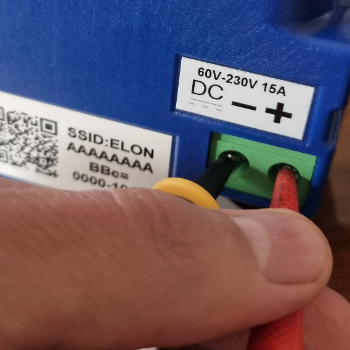
 Check using a voltage meter that AC voltage is present on the AC screw terminals (Figure 2).
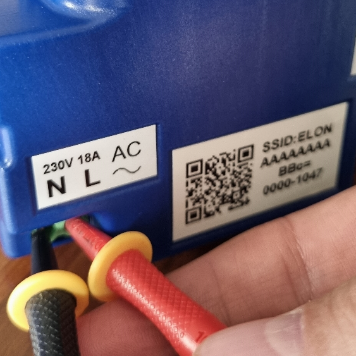
Fig 1 Checking DC voltage Fig 2 Checking AC voltage

Things to Remember
- After power up, the unit runs a self-test that takes about 30 seconds. Once the self-test passes the unit will engage the correct power source determined by the heating profile. If the water temperature is lower than the temperature set point for the source (Grid or Solar), it will start heating water. You should hear a click when this happens.
- Make sure that the wires are connected to the Elon Smart terminals securely (do a tug test with AC & DC power to the Elon Smart switched off) and check that the terminals have not been damaged (for example by overtightening).
- If the two earth wires are not connected to the earth stud the unit will fail the self-test and never start the heating process.
- Check for any geyser timers and bypass them completely or set them to “always on”.
- If you are having DC power supply issues, check if the DC circuit breaker or isolator is faulty by measuring the voltage across the DC circuit breaker or isolator whilst DC power is being supplied to the element. If there is a voltage drop across the disconnect switch, it is faulty and needs to be replaced. Also check all DC fuses if installed.
- The unit will detect the following installation faults and display them on the configuration screen. These will stop the unit from connecting power to the element until they are cleared:
- DC + and DC – are reversed (reversed polarity);
- The earth straps are not connected to the earth stud;
- AC is connected to DC input;
- There is a fault between the solar wiring and earth (insulation failure);
- Element faulty (this may happen if you insert the unit so only a single spade connector makes contact with the element);
- Unit component failure.
- The unit will also warn the installer if there is:
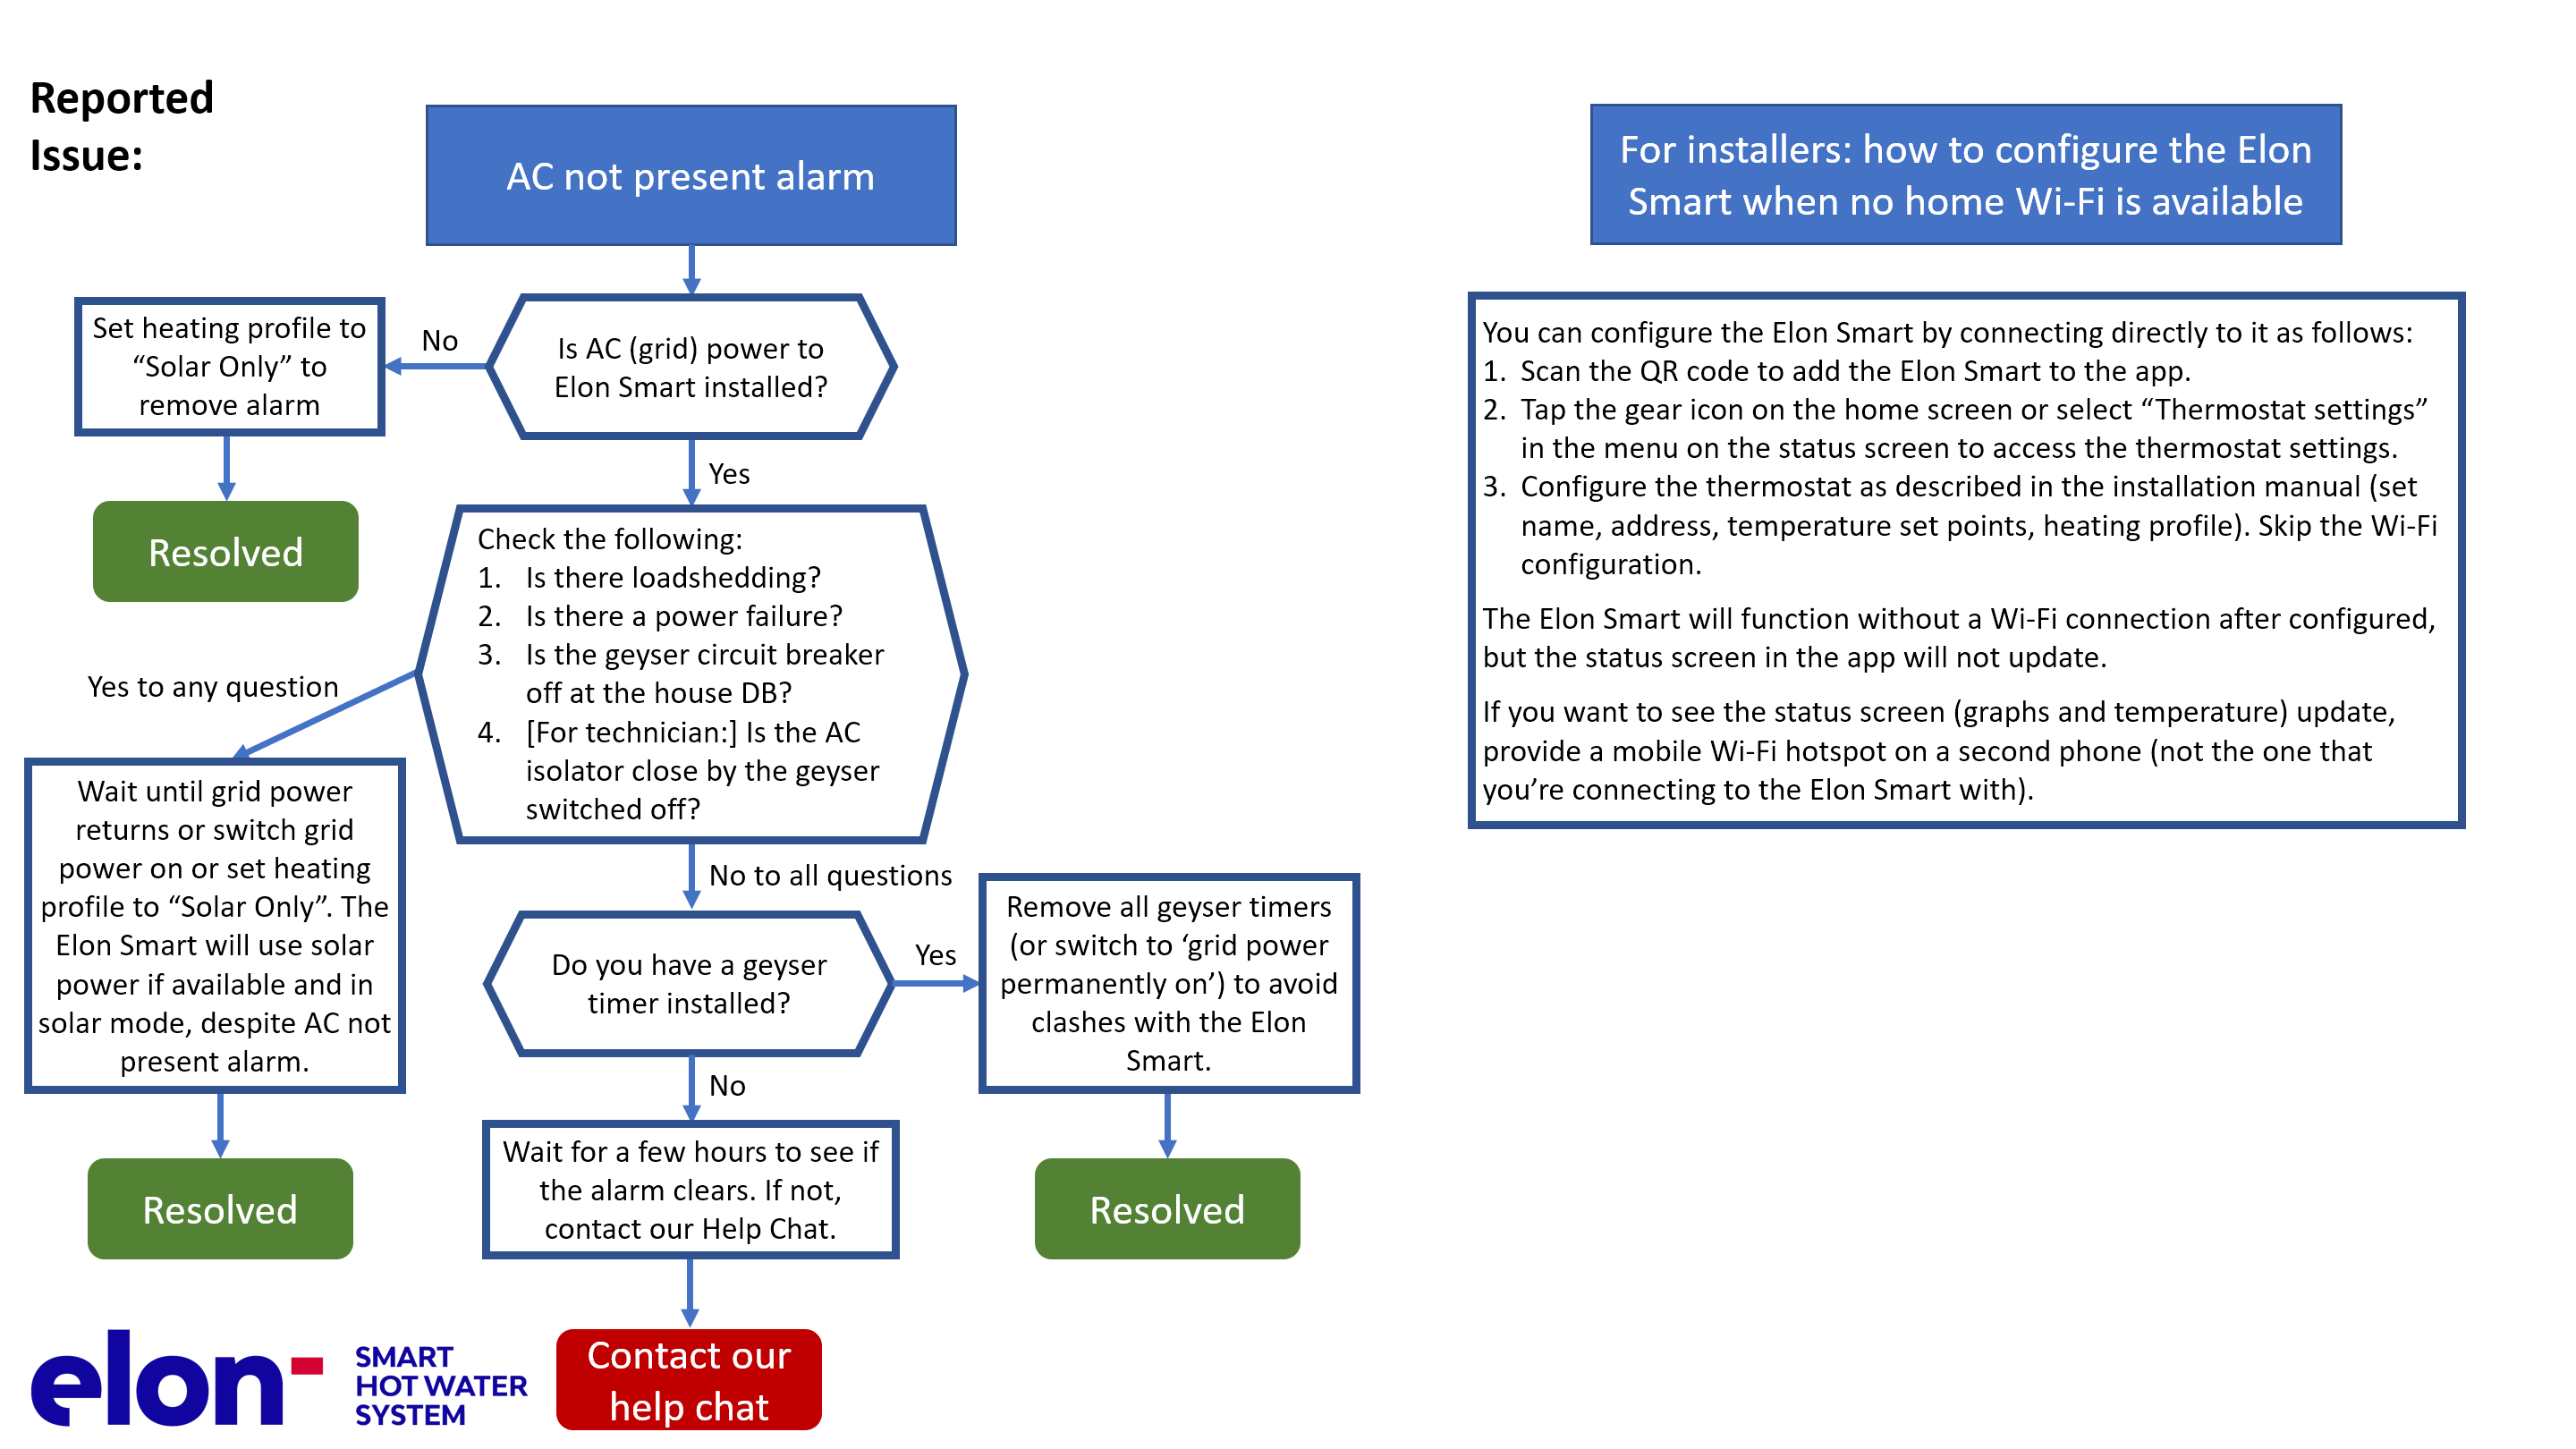
- No power on the AC input. The alarm is not shown if heating profile Solar Only is selected.
- No power on the DC input and it is daytime. The alarm is not shown if heating profile Grid Only is selected.
- For any Heating profile except Grid Only, solar power is normally engaged except for the periods listed in the table below.
- If the unit has no grid power and engaging the element causes the DC voltage of the solar panels to drop below the voltage required to power the unit, the unit disconnects the element. If AC power is supplied, then the unit can run down to 0 V on DC. If the unit disconnects the element, it will stay disconnected for 2 minutes before connecting to the element again.
- If the unit is connected to the grid, it may draw a small amount of power (<3W) from the grid even if Solar Only heating profile is selected.
- How to switch on solar power to element: Select Solar Only heating profile on the configuration screen.
- How to switch on mains power to element: Select Grid Only heating profile on the configuration screen.
Heating Profile option | Solar power use | Grid power use | Comments |
|---|---|---|---|
Grid Only | Never | Always | Select this option if you don’t have any solar panels installed. |
Solar Only | Always | Never | ONLY use solar power. NEVER use grid power. |
Morning Shower | Always except for 3 – 5 am | 3 am – 5 am | Solar power will be used whenever available, and grid power will only be used early in the morning to boost water temperature to the Grid set point if the temperature is lower than that. |
Evening Shower | Always except for 5 – 7 pm | 5 pm – 7 pm | Solar power will be used whenever available, and grid power will only be used in the late afternoon to boost water temperature to the Grid set point if the temperature is lower than that. |
Morning and Evening Shower | Always except for 3 – 5 am & 5 – 7 pm | 3 am – 5 am & 5 pm – 7 pm | Solar power will be used whenever available, and grid power will only be used in the early morning and late afternoon to boost water temperature to the Grid set point if the temperature is lower than that. |
Holiday Mode | Off | Off | System switched off completely |
Custom Profile | Whenever not in grid mode | Custom | Use the Custom Profile option to set your own grid heating timers. |
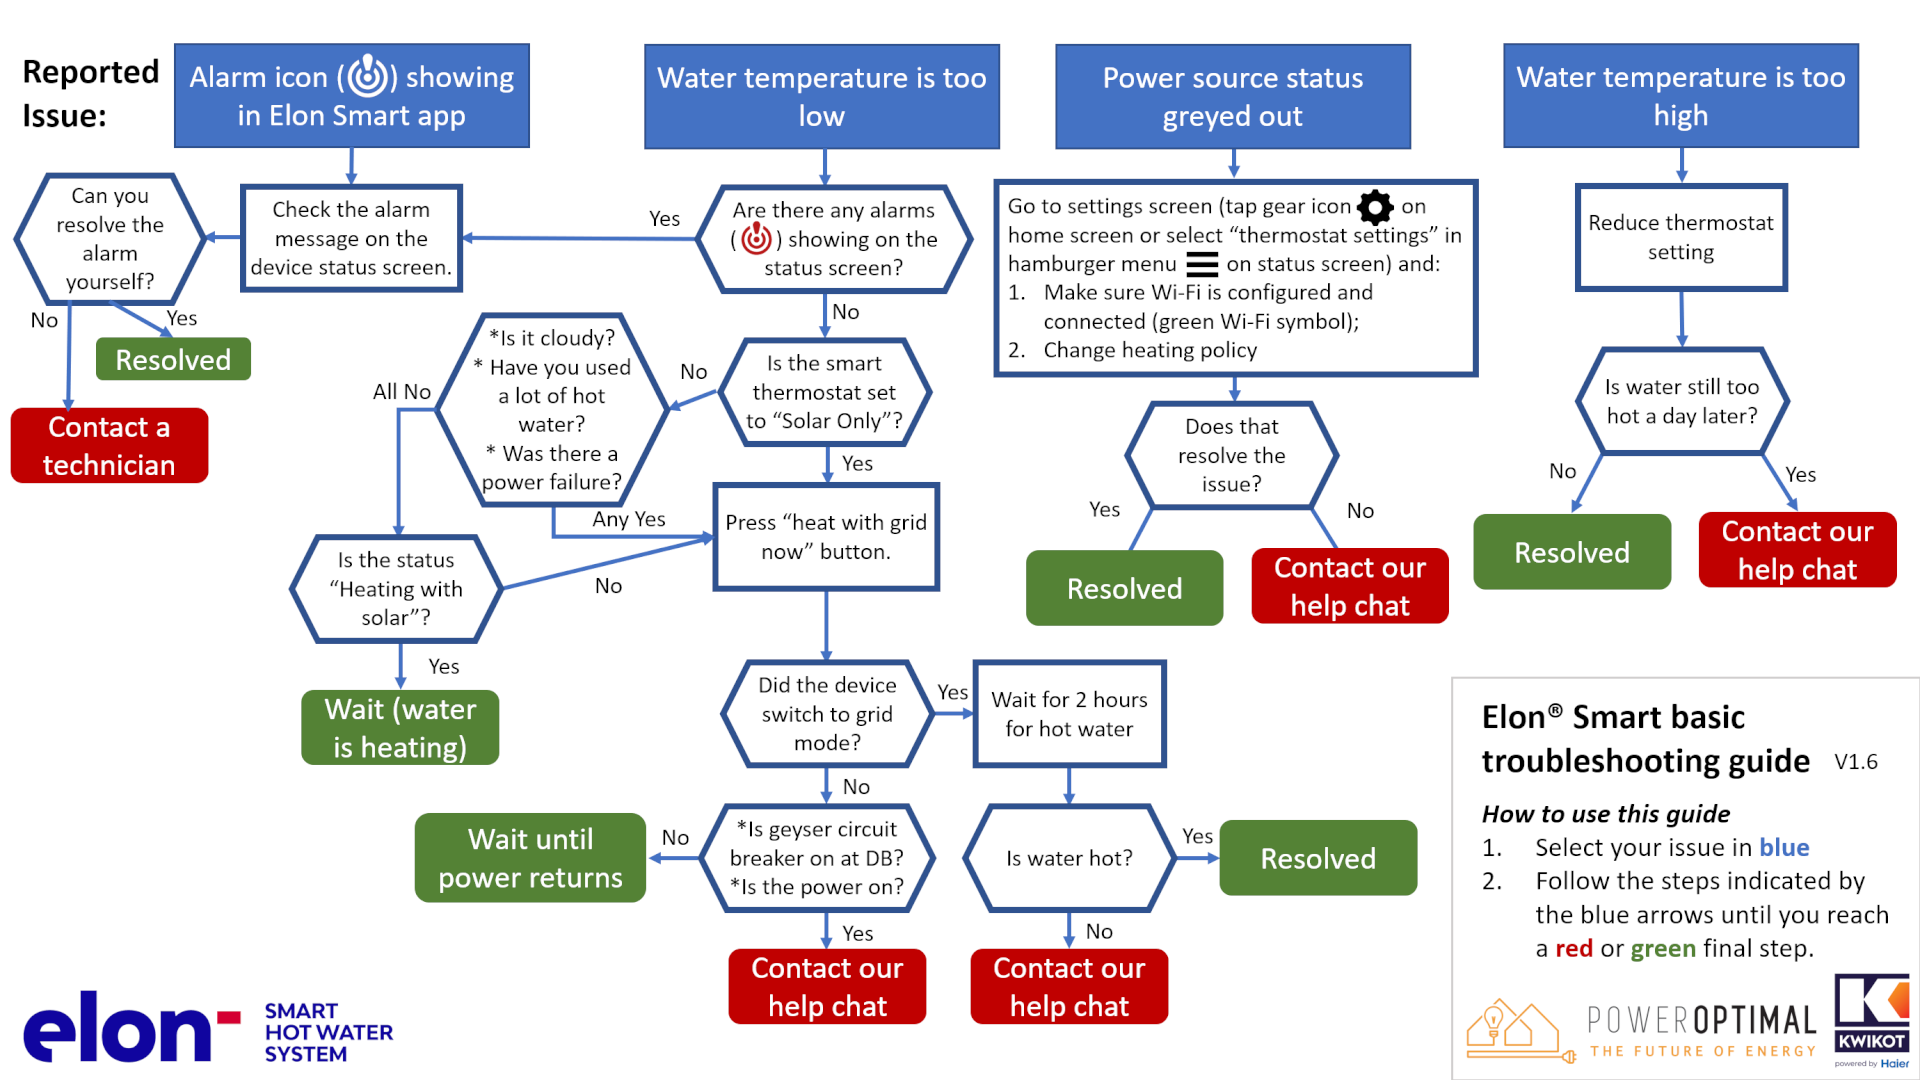
List of Alarms and How to Resolve Them
The Elon Smart has a helpful alarm system that detects and reports common issues. See the below list for the various alarms and how to resolve them.
Always check that you have the latest version of the app by going to the “Elon Smart Water” app in your app store.
ID | Alarm message | How to resolve the alarm |
|---|---|---|
0 | Element Faulty |
|
1 | Switch Failed | Contact our help chat |
2 | DC Disconnect Failed | Contact our help chat |
3 | No Power on AC Input | This can be due to several reasons:
This alarm won’t prevent the Elon Smart unit from functioning and heating water with solar (DC) power as long as there is solar power available. You can clear the alarm by switching the AC power on (where applicable), setting the Elon Smart heating profile to Solar Only or you can leave it until AC power returns. |
4 | Measurement Failure | Contact our help chat |
5 | Disconnected for Safety | When there is a safety-related alarm condition, the Elon Smart will disconnect power from the geyser. To clear this alarm, you need to clear the other safety-related alarm(s). |
6 | Water Temperature Measurement Failure | Contact our help chat |
7 | Ambient Temperature Exceeded |
|
8 | DC Wiring Insulation Failure | a. Check solar panels and DC wiring for insulation faults. b. To operate the Elon Smart whilst the insulation fault has not been located and resolved, you can set the heating profile to Grid Only or switch off the DC disconnect switch. |
9 | Insulation Self-Test Failed | Check earth wiring. Make sure both earth straps are connected securely to the geyser earth stud. |
10 | AC Wired to DC Input | Wire AC to correct input (see Chapter 4 in the Installation Manual). |
11 | DC Wired to AC Input | Wire DC to correct input (see Chapter 4 in the Installation Manual). |
12 | No Power on DC Input | This can be due to several reasons: a. There is no DC power connected to the Elon Smart b. DC power is off at the DC disconnect switch close by the Elon Smart unit. c. There is an issue with the DC wiring or solar PV installation. d. It is extremely dark and overcast during daytime. (The alarm is not active when the sun is less than 15 degrees above the horizon.) This alarm won’t prevent the Elon Smart unit from functioning and heating water with grid (AC) power as long as there is grid power available. You can clear the alarm by switching the DC power on (where applicable), fixing the DC wiring / solar PV installation, setting the Elon Smart heating profile to Grid Only (see Table 4.1) or you can leave it until DC power returns. |
13 | DC Input Reversed | The wiring on the Solar input has been installed incorrectly (in reverse). The DC+ (positive) wire has been connected to the DC- (negative) terminal on the Elon Smart and the DC- (negative) wire has been connected to the DC+ (positive) terminal on the Elon Smart. Swap the DC wires around (see Chapter 4 in the Installation Manual). |
14 | Hot Connection | Elon Smart not correctly inserted into geyser element. Switch off all power to the Elon Smart and re-seat (reinsert) the Elon Smart. |
15 | RTC Failed | Contact our help chat |
16 | Power Unstable | If it is intermittent or temporary and occurring during loadshedding or grid power failures, you can ignore this alarm. If the alarm persists whilst grid power is available, check the following: a. Check that wiring to Elon Smart is properly connected and not loose. b. Check whether geyser circuit breaker in DB or the geyser’s AC isolator are faulty or wiring is not properly connected. c. If none of the above are present, then contact our help chat. |
17 | Server Not Available |
If none of the above works, try rebooting the Elon Smart by switching off both the AC isolator (or geyser circuit breaker on the house DB) and the DC circuit breaker for 2 minutes. |
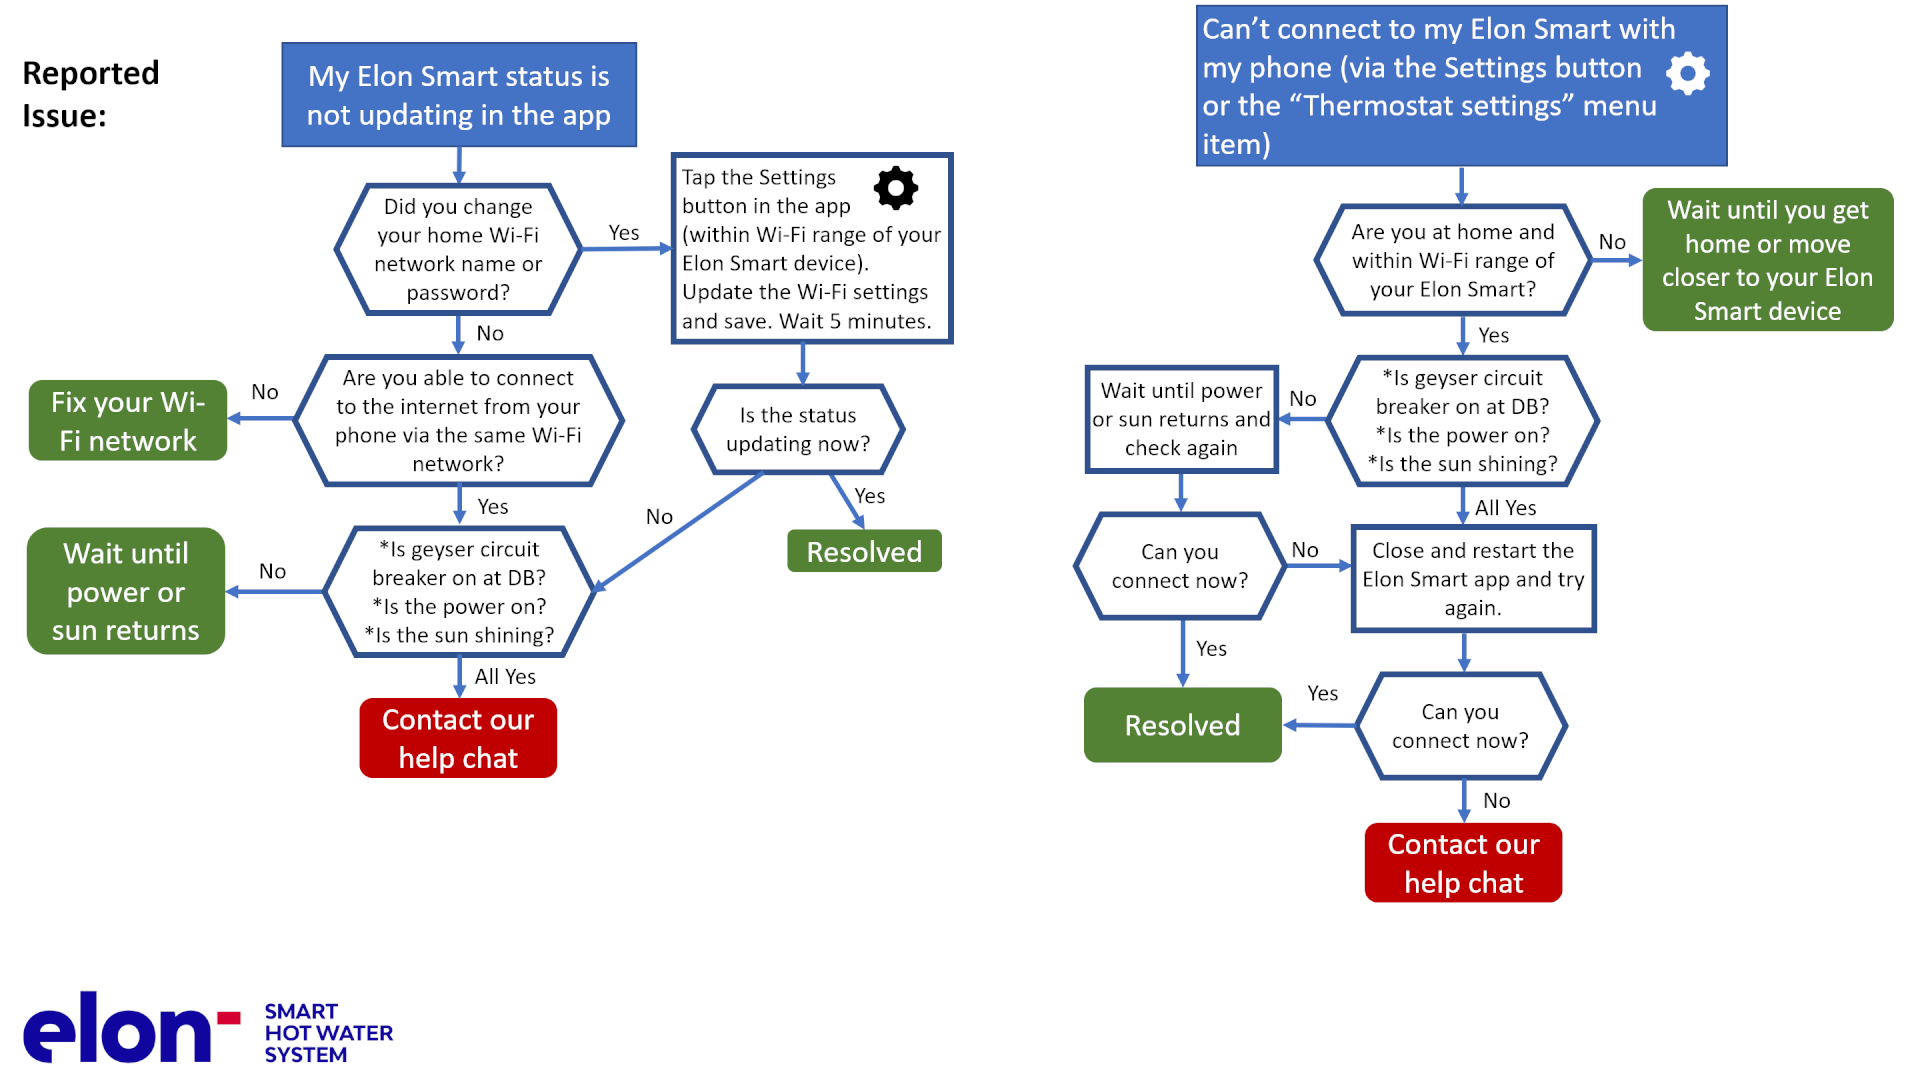
 Check the Elon Smart Wi-Fi settings on the thermostat settings screen (access by tapping the gear icon in the app when within Wi-Fi range of the Elon Smart).
The below basic troubleshooting guide for users might also be of use to you.