PowerOptimal Elon® 100 Troubleshooting Guide for Electricians v2.12
NOTE: This Troubleshooting Guide is intended for electricians and not general users. Users should please refer to the User Manual, which can be found at www.poweroptimal.com/manuals. Please see page 3 for a summary of the Elon®’s controller and LED lights. Always check the PowerOptimal website for the latest version of this guide.
|
|
| |||||
|
| ||||||
|
| ||||||
| |||||||
| |||||||
Troubleshooting Steps
If you have a test controller (little black box with the control dial & lights), plug it into the Elon®.If you identify the problem at a specific step, you can stop there and write your conclusion.If you replace an Elon®, thermostat, element or wiring, you should commission the system again as per the Installation Manual.
|
|
|
|
|
|
| |
|
| ||
|
|
| |
| |||
|
|
| |
|
|
| |
| |||
|
|
| |
|
|
| |
| |||
|
|
| |
|
|
| |
|
|
| |
|
| ||
Things to Remember
Thered mains LEDwill only start functioning once stable mains voltage between 190 and 260 V AC is present for more than5 minutes. (In other words, the Elon® will only allow mains power to the element 5 minutes after mains connection or switch-on.)Solar poweris only recognised40 secondsafter active solar panels are connected to Elon®.Anopen thermostat(water at correct temperature) measures between11 and 14 V DCacross the “thermostat” terminals on the Elon®. Polarity across these terminals is not important.Aclosed thermostat(cold water)measures 0 Vacross the “thermostat” terminals on the Elon®.If the thermostat measures between 11 and 14 V DC in theclosedstate, either the thermostat is faulty OR the thermal fuse on the element adapter might have blown. Check continuity on the element adapter thermostat female terminals. If there is no continuity, the thermal fuse has blown and you need to replace the element adapter.How to switch on solar power to element: With enough solar energy (check at solar terminals), solar power will be routed to the element within 15 seconds after the thermostat closes and the controller dial is set to “SOLAR ONLY”. A green flashing LED indicates this condition.How to switch on mains power to element:Turn control dial to “MAINS ONLY” and, if the thermostat is closed, mains power will be directed to the element indicated by a red flashing LED.Note:Once the dial has been turned to “MAINS ONLY”, it will complete a full mains heating cycle (until the thermostat opens). Turning the control back to “SOLAR ONLY” at this point will not immediately switch the unit back to solar power. It will only switch back again after the mains heating cycle is completed (i.e. the thermostat opens) and the thermostat then closes again. You can finish the mains heating cycle faster by reducing the thermostat temperature setting until the thermostat opens.Test solar power first.If you are having DC power supply issues,check if the DC circuit breaker or isolator is faultyby measuring the voltage across the DC circuit breaker or isolator whilst DC power is being supplied to the element. If there is a voltage drop across the disconnect switch, it is faulty and needs to be replaced. Also check all DC fuses if installed.Fast flashing red / green LEDsindicate either:a short between a PV (photovoltaic) lead and earth – this condition prevents solar power to the element;a partial short of the element to earth, e.g., a puncture exposing element to water. This condition can be ruled out by disconnecting both wires to the element. If the LEDs stop flashing after about 20 seconds, the element is faulty. If the LEDs continue flashing, then the cause is likely as per item a. above.Please note:wait at least 20 seconds after any disconnection or other correction step for the LEDs to stop flashing.
The Mains & Solar indicator lights (LEDs) indicate the following conditions:
|
|
|
|
|
|
|
|
|
|
|
|
|
|
|
|
|
|
|
|
|
|
|
|
|
|
|


 ⏺⏺
⏺⏺
 ⏺⏺
⏺⏺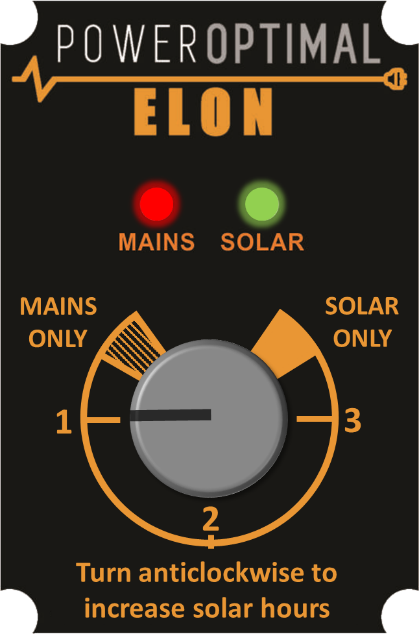
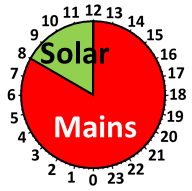
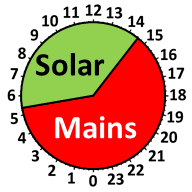
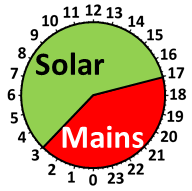
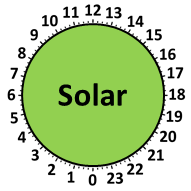
The control dial sets the mains & solar times as follows:
* Times are approximate – will vary slightly with season and location
|
|
| |
|
|
|
|
|
|
|
|
|
|
|
|
|
|
|
|
|
|
|
|