| Rated input voltage | 230V AC, 230V DC |
| Rated input current | 18A AC, 15A DC |
| Mains (AC) voltage range | 230V +10% -15% |
| System power supply | Solar PV DC or 230V AC mains |
| Power consumption | 3W on either AC or DC (solar) power |
| Data retention on device | 2 weeks for high-resolution server data, 1 year for mobile app data |
| Solar voltage | 30 – 230 V DC |
| Thermostat | Electronic thermostat with 0.5 °C accuracy |
| Safety | Electromechanical thermal cutout |
| Reverse polarity protection | For solar PV connections |
| Lightning protection | 8 kA |
| Self-tests | Component failure, wiring failure, element failure, insulation failure, hot connection |
| Enclosure ingress protection rating | IP40 |
| Radiated immunity | IEC 61000-4-3 Level 3, 10 V/m |
| Annual energy production compared to inverter-based system | > 90% when solar PV array and geyser element are matched correctly |
| Standards conformance | SANS 60730-1, SANS 60730-2-9, SANS / EN 301 489-1, SANS / EN 301 489-17, ICASA Type Approval, LoA from NRCS |
| Dimensions & weight | 23 x 12 x 11 cm, 0.3 kg. Box dimensions: 27.6 x 17.5 x 13.5 cm |
| Patents | Granted: ZA2019/02129, GB2583814B, ZA2022/08516, EP 4100979, US 12,122,914, GB2618349, ZA2024/08399, EP4519612 Pending: PCT/ZA2024/050065, CN2023800381161, US 18/861,142, AU2023265634, ZA2023/11726, ZA2024/08845, PCT/ZA2025/050066 |
| Registered Designs | ZA F2022/00962, F2022/00963 |
| Communications link | Wi-Fi Client, Wi-Fi Hotspot (2.4 GHz) |
| Measurements | AC energy, voltage, current (5%) DC energy, voltage, current (5%) Temperature: water & ambient |
| Data logging | 15-second data retained for 14 days 5-minute data retained for 366 days |
| Other features | Mobile app for installers and users Full installation self-check Remote firmware upgrades 50 000+ switching operations on thermostat Cloud backend for remote monitoring & alerts Estimation of water use |
| Advanced features scheduled for external availability in H2 2026 | Leak detection (software-based) Anode condition monitoring |
| **Solar PV array size** **(kWp)** | **Best matching geyser element size** **(kW)** | **2nd choice geyser element size\*** **(kW)** | **Geyser (water tank) size** **(litres)** |
| **1 – 1.6** | **4** | 3 | 100 - 200 |
| **1.6 – 2** | **3** | 4 or 2 | 100 - 200 |
| **2 – 3** | **3** | 4 | 150 – 300 |
| **Elon® Smart User Manual** | [**www.poweroptimal.com/manuals**](http://www.poweroptimal.com/manuals) |
| **Training videos for installers** | [**www.poweroptimal.com/training**](http://www.poweroptimal.com/training) |
| **Heating Profile option** | **Solar power use** | **Grid power use** | **Comments** |
| **Grid Only** | Never | Always | Select this option if you don’t have any solar panels installed. |
| **Solar Only** | Always | Never | ONLY use solar power. NEVER use grid power. |
| **Morning Shower** | Always except for 3 am – 5 am | 3 am – 5 am | Solar power will be used whenever available, and grid power will only be used early in the morning to boost water temperature to the Grid set point if the temperature is lower than that. |
| **Evening Shower** | Always except for 5 pm – 7 pm | 5 pm – 7 pm | Solar power will be used whenever available, and grid power will only be used in the late afternoon to boost water temperature to the Grid set point if the temperature is lower than that. |
| **Morning and Evening Shower** | Always except for 3 am – 5 am & 5 pm – 7 pm | 3 am – 5 am & 5 pm – 7 pm | Solar power will be used whenever available, and grid power will only be used in the early morning and late afternoon to boost water temperature to the Grid set point if the temperature is lower than that. |
| **Holiday Mode** | Off | Off | System switched off completely |
| **Custom Profile** | Whenever not in grid mode | Custom | Use the Custom Profile option to set your own grid heating timers. |
| **ID** | **Alarm message** | **How to resolve the alarm** |
|---|---|---|
| 0 | Element Faulty | a. Check that the thermostat is inserted correctly. b. If that does not clear the alarm, measure element resistance and replace if necessary. |
| 1 | Switch Failed | Contact our help chat |
| 2 | DC Disconnect Failed | Contact our help chat |
| 3 | No Power on AC Input | This can be due to several reasons: a. There is no AC power connected to the Elon Smart b. AC power is off at the circuit breaker in the DB board or at the AC isolator close by the Elon Smart unit. c. There is a power failure or loadshedding. d. You have a geyser timer installed. This alarm won’t prevent the Elon Smart unit from functioning and heating water with solar (DC) power as long as there is solar power available. You can clear the alarm by switching the AC power on (where applicable), setting the Elon Smart heating policy to *Solar Only* (see Table 4.1) or you can leave it until AC power returns. |
| 4 | Measurement Failure | Contact our help chat |
| 5 | Disconnected for Safety | When there is a safety-related alarm condition, the Elon Smart will disconnect power from the geyser. To clear this alarm, you need to clear the other safety-related alarm(s). |
| 6 | Water Temperature Measurement Failure | Contact our help chat |
| 7 | Ambient Temperature Exceeded | a. Check the installation. If the geyser is installed in direct sunlight, see if you can provide shade to the geyser end space area where the Elon Smart is located. b. Reduce temperature set point by 5 degrees. c. Wait until temperatures cool down. The Elon Smart will start up again. d. Contact our help chat if the above doesn’t clear the alarm. |
| 8 | DC Wiring Insulation Failure | a. Check solar panels and DC wiring for insulation faults. b. To operate the Elon Smart whilst the insulation fault has not been located and resolved, you can set the heating profile to *Grid Only* or switch off the DC disconnect switch. |
| 9 | Insulation Self-Test Failed | a. Check earth wiring. Make sure both earth straps are connected securely to the geyser earth stud. |
| 10 | AC Wired to DC Input | Wire AC to correct input (see Chapter 4). |
| 11 | DC Wired to AC Input | Wire DC to correct input (see Chapter 4). |
| 12 | No Power on DC Input | This can be due to several reasons: a. There is no DC power connected to the Elon Smart b. DC power is off at the DC disconnect switch close by the Elon Smart unit. c. There is an issue with the DC wiring or solar PV installation. d. It is extremely dark and overcast during daytime. (The alarm is not active when the sun is less than 15 degrees above the horizon.) This alarm won’t prevent the Elon Smart unit from functioning and heating water with grid (AC) power as long as there is grid power available. You can clear the alarm by: - - 1. switching the DC power on (where applicable); 2. setting the Elon Smart heating profile to *Grid Only*; 3. leaving it until DC power returns; or 4. inspect and fixing the DC wiring and/or solar PV installation. |
| 13 | DC Input Reversed | The wiring on the Solar input has been installed incorrectly (in reverse). The DC+ (positive) wire has been connected to the DC- (negative) terminal on the Elon Smart and the DC- (negative) wire has been connected to the DC+ (positive) terminal on the Elon Smart. Swap the DC wires around (see Chapter 4). |
| 14 | Hot Connection | Elon Smart not correctly inserted into geyser element. Switch off all power to the Elon Smart and re-seat (reinsert) the Elon Smart. |
| 15 | RTC Failed | Contact our help chat |
| 16 | Power Unstable | 1. If it is intermittent or temporary and occurring during loadshedding or grid power failures, you can ignore this alarm. 2. If the alarm persists whilst grid power is available, check the following: 1. Check that wiring to Elon Smart is properly connected and not loose. 2. Check whether geyser circuit breaker in DB or the geyser’s AC isolator are faulty or wiring is not properly connected. 3. If none of the above are present, then contact our help chat. |
| 17 | Server Not Available | 1. Check that your home Wi-Fi network has internet connectivity. 2. Check the Elon Smart Wi-Fi settings on the thermostat settings screen (access by tapping the gear icon in the app when at home). 3. If your Wi-Fi router is far away from your geyser, the Wi-Fi signal might be too weak. This can be improved with a Wi-Fi extender or signal booster. If none of the above works, try rebooting your Elon Smart by switching off the geyser circuit breaker on your house DB board at night for 2 minutes. |
| **Location** | **Electricity generated kWh/kWp per year** |
| Bloemfontein | 2055 |
| Cape Town | 1762 |
| Durban | 1570 |
| Johannesburg / Pretoria | 1871 |
| Mbombela | 1766 |
| Port Elizabeth | 1698 |
| Upington | 2075 |
| **Solar PV array size** **(kWp)** | **Showers per day\*** | **50%+ of daily hot water use provided for how many people?** | **How many people off-grid for hot water?** | **Typical number of solar PV modules** |
| **1 – 1.6** |  |  |  | **2 - 3 modules** |
| **1.6 - 2** |  |  |  | **3 - 4 modules** |
| **2 - 3** |  |  |  | **4 - 5 modules** |
| **Solar + Elon®** | **Annual average litres of water heated per day for X kWp installed solar capacity** | |||||||||||||||||
|---|---|---|---|---|---|---|---|---|---|---|---|---|---|---|---|---|---|---|
| **Location** | **kWh/kWp/yr** | **0.8 kWp** | **1 kWp** | **1.2 kWp** | **1.4 kWp** | **1.6 kWp** | **1.8 kWp** | **2 kWp** | **2.5 kWp** | **3 kWp** | **3.5 kWp** | |||||||
| Bloemfontein | 1894 | 80 | 99 | 119 | 139 | 159 | 179 | 199 | 249 | 298 | 348 | |||||||
| Cape Town | 1624 | 68 | 85 | 102 | 119 | 136 | 154 | 171 | 213 | 256 | 299 | |||||||
| Durban | 1447 | 61 | 76 | 91 | 106 | 122 | 137 | 152 | 190 | 228 | 266 | |||||||
| Jhb/Pretoria | 1724 | 72 | 91 | 109 | 127 | 145 | 163 | 181 | 226 | 272 | 317 | |||||||
| Mbombela | 1627 | 68 | 85 | 103 | 120 | 137 | 154 | 171 | 214 | 256 | 299 | |||||||
| Gqeberha (PE) | 1565 | 66 | 82 | 99 | 115 | 132 | 148 | 164 | 205 | 247 | 288 | |||||||
| Upington | 1912 | 80 | 100 | 121 | 141 | 161 | 181 | 201 | 251 | 301 | 352 | |||||||
| Saldanha | 1623 | 68 | 85 | 102 | 119 | 136 | 153 | 170 | 213 | 256 | 298 | |||||||
| **Solar + Elon®** | **Number of showers per day (based on annual average) for X kWp installed solar capacity** | ||||||||||
| **Location** | **kWh/kWp/yr** | **0.8 kWp** | **1 kWp** | **1.2 kWp** | **1.4 kWp** | **1.6 kWp** | **1.8 kWp** | **2 kWp** | **2.5 kWp** | **3 kWp** | |
| Bloemfontein | **1894** | **2.4** | **3.0** | **3.6** | **4.2** | **4.8** | **5.4** | **6.0** | **7.5** | **9.0** | |
| Cape Town | **1624** | **2.0** | **2.6** | **3.1** | **3.6** | **4.1** | **4.6** | **5.1** | **6.4** | **7.7** | |
| Durban | **1447** | **1.8** | **2.3** | **2.7** | **3.2** | **3.6** | **4.1** | **4.6** | **5.7** | **6.8** | |
| Jhb/Pretoria | **1724** | **2.2** | **2.7** | **3.3** | **3.8** | **4.3** | **4.9** | **5.4** | **6.8** | **8.2** | |
| Mbombela | **1627** | **2.1** | **2.6** | **3.1** | **3.6** | **4.1** | **4.6** | **5.1** | **6.4** | **7.7** | |
| Gqeberha (PE) | **1565** | **2.0** | **2.5** | **3.0** | **3.5** | **3.9** | **4.4** | **4.9** | **6.2** | **7.4** | |
| Upington | **1912** | **2.4** | **3.0** | **3.6** | **4.2** | **4.8** | **5.4** | **6.0** | **7.5** | **9.0** | |
| Saldanha | **1623** | **2.0** | **2.6** | **3.1** | **3.6** | **4.1** | **4.6** | **5.1** | **6.4** | **7.7** | |
| Solar + Elon® | **Annual average % of hot water requirement supplied for 2 people each using 80 litres of hot water per day for X kWp installed solar capacity** | ||||||||||
| Location | kWh/kWp/yr | **0.8 kWp** | **1 kWp** | **1.2 kWp** | **1.4 kWp** | **1.6 kWp** | **1.8 kWp** | **2 kWp** | **2.5 kWp** | **3 kWp** | |
| Bloemfontein | 1894 | **50%** | **62%** | **75%** | **87%** | **99%** | **112%** | **124%** | **155%** | **187%** | |
| Cape Town | 1624 | **43%** | **53%** | **64%** | **75%** | **85%** | **96%** | **107%** | **133%** | **160%** | |
| Durban | 1447 | **38%** | **47%** | **57%** | **66%** | **76%** | **85%** | **95%** | **119%** | **142%** | |
| Jhb/Pretoria | 1724 | **45%** | **57%** | **68%** | **79%** | **91%** | **102%** | **113%** | **142%** | **170%** | |
| Nelspruit | 1627 | **43%** | **53%** | **64%** | **75%** | **85%** | **96%** | **107%** | **134%** | **160%** | |
| Gqeberha (PE) | 1565 | **41%** | **51%** | **62%** | **72%** | **82%** | **92%** | **103%** | **128%** | **154%** | |
| Upington | 1912 | **50%** | **63%** | **75%** | **88%** | **100%** | **113%** | **126%** | **157%** | **188%** | |
| Saldanha | 1623 | **43%** | **53%** | **64%** | **75%** | **85%** | **96%** | **107%** | **133%** | **160%** | |
| **Solar PV array size** **(kWp)** | **Best matching geyser element size** **(kW)** | **2nd choice geyser element size\*** **(kW)** | **Geyser (water tank) size** **(litres)** |
| **1 – 1.6** | **4** | 3 | 100 - 200 |
| **1.6 – 2** | **3** | 4 or 2 | 100 - 200 |
| **2 – 3** | **3** | 4 | 150 – 300 |
| **Rated input voltage** | 230V AC, 230V DC |
| **Rated input current** | 18A AC, 15A DC |
| **Mains (AC) voltage range** | 230V +10% -15% |
| **System power supply** | Solar PV DC or 230V AC mains |
| **Power consumption** | 3W on either AC or DC (solar) power |
| **Solar voltage** | 30 – 230 V DC |
| **Thermostat** | Electronic thermostat with 0.5 °C accuracy |
| **Safety** | Electromechanical thermal cutout |
| **Reverse polarity protection** | For solar PV connections |
| **Lightning protection** | 8 kA |
| **Self-tests** | Component failure, wiring failure, element failure, insulation failure, hot connections |
| **Enclosure ingress protection rating** | IP40 |
| **Annual energy production compared to inverter-based system** | > 90% when solar PV array and geyser element are matched correctly |
| **Standards conformance** | SANS 60730-1, SANS 60730-2-9, SANS / EN 301 489-1, SANS / EN 301 489-17, ICASA Type Approval, LoA from NRCS |
| **Dimensions & weight** | 23 x 12 x 11 cm, 0.3 kg. Box dimensions: 27.6 x 17.5 x 13.5 cm. |
| **Patents** | Granted: ZA 2019/02129, GB2583814B, ZA 2022/08516, EP 4100979, US 12,122,914, GB2618349 Pending: PCT/ZA2024/050065, GB2618349, ZA2024/08399, CH2023800381161, US 18/861,142, EP23723798.7, AU2023265634, ZA2024/08845 |
| **Registered Designs** | ZA F2022/00962 (granted), F2022/00963 (granted) |
| **Communications link** | Wi-Fi Client, Wi-Fi Hotspot (2.4 GHz) |
| **Measurements** | AC energy, voltage, current (5%) DC energy, voltage, current (5%) Temperature: water & ambient |
| **Data logging** | 15-second data retained for 14 days 5-minute data retained for 366 days |
| **Other features** | Mobile app for installers and users Full installation self-check Remote firmware upgrades 50 000+ switching operations on thermostat |
| Type of installation | Individual residential premises | Terrestrial production plant | Service / Industrial / Agricultural Buildings |
| Lcrit (in meter) | 115/Ng | 200/Ng | 450/Ng |
| **City** | **Lightning strike density Ng (strikes/km²/yr)** | **Lcrit (m)** | |
|---|---|---|---|
| **Individual residential premises** | **Service / industrial / agricultural buildings** | ||
| Cape Town | 0.02 to 4 | 29 | 113 |
| Stellenbosch | 0.02 to 4 | 29 | 113 |
| Worcester | 0.02 to 4 | 29 | 113 |
| George | 0.02 to 4 | 29 | 113 |
| Saldanha | 0.02 to 4 | 29 | 113 |
| Gqeberha (Port Elizabeth) | 0.02 to 4 | 29 | 113 |
| Buffalo City (East London) | 4 to 6 | 19 | 75 |
| King Williams Town | 4 to 6 | 19 | 75 |
| Beaufort-West | 4 to 6 | 19 | 75 |
| Musina | 4 to 6 | 19 | 75 |
| Britstown | 6 to 15 | 8 | 30 |
| Durban | 6 to 15 | 8 | 30 |
| Upington | 6 to 15 | 8 | 30 |
| Pietermaritzburg | 15 to 21 | 5 | 21 |
| Greytown | 15 to 21 | 5 | 21 |
| Polokwane | 15 to 21 | 5 | 21 |
| Bloemfontein | 15 to 21 | 5 | 21 |
| Queenstown | 15 to 21 | 5 | 21 |
| Vryburg | 15 to 21 | 5 | 21 |
| Mahikeng | 15 to 21 | 5 | 21 |
| Mbombela (Nelspruit) | 15 to 21 | 5 | 21 |
| Kimberley | 21 to 27 | 4 | 16 |
| Pretoria | 21 to 27 | 4 | 16 |
| Vereeniging | 21 to 27 | 4 | 16 |
| Welkom | 21 to 27 | 4 | 16 |
| Johannesburg | 27 to 33 | 3.5 | 13 |
| Ermelo | 33 to 42 | 2.5 | 10 |
| Newcastle | 33 to 42 | 2.5 | 10 |
| **Customer Name** | |||||||
| **Customer Address** | |||||||
| **Date** | **Elon® serial no.** | ||||||
| **What is the issue?** | |||||||
| **How long have you been experiencing this issue?** | |||||||
| **Have you had any power failures recently?** | |||||||
| **Have you used more hot water than usual (such as having guests over), or at a different time than usual?** | |||||||
| **Has the weather been cloudy or rainy in the last day or two?** | |||||||
| **Any alarms? (Indicated with an emphasised red exclamation mark on the home screen and with an alarm message on the status screen)** | **Yes** **🞏** | **No** **🞏** | **Alarm message** | ||||
| **What heating profile is the Elon Smart thermostat set to?** | |||||||
| **What are the temperature set points?** | **Solar** | **°C** | **Grid** | **°C** | |||
| **What is the water temperature?** | |||||||
| **Do you have the latest version of the Elon Smart app?** | |||||||
| **Position of geyser circuit breaker in DB (distribution board) (X)** | **On 🞏** | **Off 🞏** | **Don’t know 🞏** | ||||
| **Anything else to note?** | |||||||
| **Unit no.** | **Development name** | **Elon®** **serial no.** | |||||
| **Date** | **Name: 1st level support person** | ||||||
| **Unit construction status (Works OR Final Completion)** | **Resident name** | ||||||
| **Reported issue (customer)** | |||||||
| **Reported issue (Level 1 Support)** | |||||||
| **No.** | **Action** | **Result** | **Units** | |
| 1 | Open the Elon Smart app. (Download the **Elon Smart Water** app from the Google Play or Apple app stores if you don’t have it installed on your phone. Make sure that you have the **latest version** of the app – you can check by searching “Elon Smart Water” in your app store and tapping “Update”.) | **🞏** | ||
| 2 | If you don’t have the specific thermostat in your device list, scan its QR code (on the house DB or on the thermostat itself) to add it by tapping the **+** button in the Elon Smart app. | **🞏** | ||
| 3 | Open the **Thermostat** **Settings** screen by tapping the Settings button (the gear icon) to the right of the thermostat on the app status screen. | **🞏** | ||
| 4 | Check for any alarms at the bottom of the screen and rectify accordingly (See **list of alarms** at the end of this guide) | **🞏** | ||
| 5 | If you cannot access the thermostat from the app, confirm that 1. the DC isolator / circuit breaker is closed (on); 2. the AC circuit breaker at DB and AC isolator are closed (on). | **🞏** | DC closed | |
| **🞏** | AC closed | |||
| 6 | If you still cannot access the thermostat from the app, remove the geyser end cover and: 1. Visually inspect the wiring ensuring that AC and DC wiring are still inserted into screw terminals; 2. Check using a voltage meter that DC voltage is present on the DC screw terminals and polarity is not reversed (Figure 1); 3. 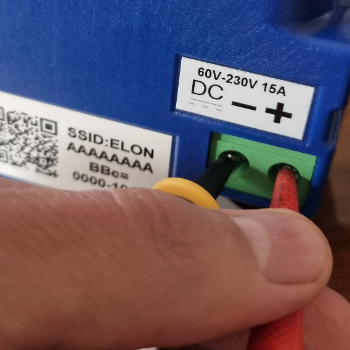Check using a voltage meter that AC voltage is present on the AC screw terminals (Figure 2). | **🞏** | Wiring correct | |
| V DC & correct polarity | ||||
|  | ||||